Before You Start
To connect your computer - the Viewer; and your clients computer - the
Server; the computers must be able to find each other over the Internet. Every computer on the ‘net, wheather Yahoo
or your personal home computer, needs a unique IP address. The big boy’s address never changes, it is
“Static”. That way everyone can always
find Yahoo, Google, AOL, etc, at the same address. The IP address is a series of four 3 digit numbers separated by
“dots” in the form 123.156.234.189.
Each 3 digit number can be a maximum of 255 and leading “0”’s can be
ommited. So the largest IP address
would be 255.255.255.255 and the smallest would be 001.001.001.001 (or 1.1.1.1
if you omit the leading “0”’s). Some
numbers are reserved for admin functions and are unavailable.
To make things easier for
web-surfers, static IP addresses can be associated with an alpha name. This is called domain name registration,
where a registered name is assigned to a static numerical IP address. When a surfer types “Yahoo.com”, for
example, into their browser address bar the name is “Resolved” to the numerical
IP address by the Registrar and the connection is made. The surfer’s current “return” IP address is
automatically sent along when requesting connection.
Most home users are assigned
a “Dynamic” IP address by their Internet Service Provider (ISP). This address is not permanent and can
change. With routers and Broadband, it
is the router that is assigned an IP address.
Network problems, maintenence, disconnects, or router reboots, can cause
a new IP address to be assigned.
But if you want to establish
a direct PcHelpWare remote connection between two PC’s, the Server PC needs to
know the Viewer PC’s IP address at the time the connection is made. The Server sends along a return IP address
when establishing a connection so the Viewer can return the connection. When the the Server executable file is
generated in PcHelpware, the software detects the current external IP address
of the Viewer computer and incorporates it into the file. Until your IP address changes the generated
file will work but as soon as your IP address changes it will no longer connect
and a new Server exe file must be generated.
Page 1
To
get around this problem you can use a service such as No-IP.com or
DynDNS.com. Both offer free
accounts. These services simulates a
static IP address for your Server exe files
by maintaining a database of
customer’s current, freqently updated, IP addresses that are tied to a
Universal Resource Locater, or URL address that you setup with their service –
petessupport.NoIP.com for example. You
will use this URL when generating the Server exe for your customers. The computer running the Viewer software
will also run a small updater program that notifies No-IP or DynDNS whenever
your IP address changes and your new connection info is instantly updated in
their database. Your client’s computer,
using the Server exe you supplied, will always find you at
petessupport.NoIP.com (e.g.) and you won’t have to constantly update the Server
exe you provided your customers, when your numerical dynamic IP address
changes.
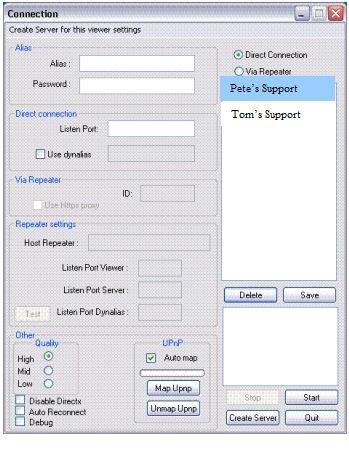
Creating a Viewer
Connection Profile
Open
the PcHelpWare_viewer.exe that you will find in your new PcHelpware
folder. The following will appear:
Near the bottom on the left side are three Quality
options: High, Mid, and Low. The High
option requires faster Internet connect speeds than Mid or Low. If the Viewer seems sluggish during
connection, lower this setting.
 Below the Quality section are three other choices:
Disable
Directx - disables Direct X when a conflict with Java is suspected.
Auto
Reconnect - enables an auto connect feature if the connection breaks.
Debug
- is for troubleshooting.
You
can leave these blank for now.
The UPnP Section:
 Some newer routers support the UPnP protocol that allows for automatic
port forwarding. If you do not know for
sure that your router supports UPnP
or if you are unsure how UPnP works with port forwarding, disable it by unchecking
the Auto map box. Manual Port
Forwarding will be explained later.
Some newer routers support the UPnP protocol that allows for automatic
port forwarding. If you do not know for
sure that your router supports UPnP
or if you are unsure how UPnP works with port forwarding, disable it by unchecking
the Auto map box. Manual Port
Forwarding will be explained later.
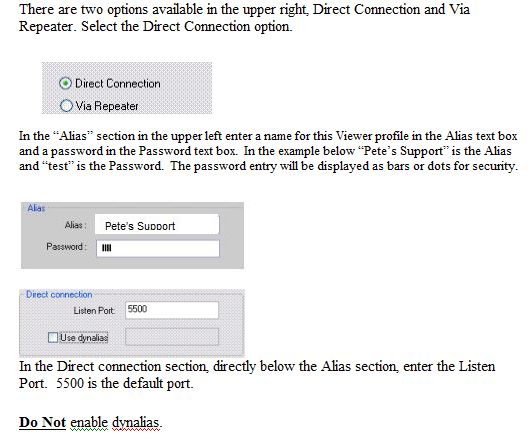
Now you can save your Viewer profile. Click the Save
button on the right. Your new
Viewer profile will appear in the Window above the Save button. When you create additional Viewer
profiles they will appear in this window when you start the Viewer
application. You must select a
profile from this window by clicking on it, the settings you entered for
that profile will then appear in the appropriate text boxes. Next click the Start button located in a
four-button group at the bottom of the left side of the Connection application
to open the selected Viewer in Listen mode.

The
Quit button closes the application and the connection. The Stop button closes the connection
without closing the application. The Create Server button is explained
below.

Creating A Direct
Connect Server from your Saved Viewer Profile
A Server ip address
selection box will open with your current external ip address, shown as
123.123.123.123 in the example on the right. If you have static public IP address (unlikely) just Click OK. If you have a dynamic IP address (more
likely) and will be using an IP provider such as No-Ip.com, delete the
detected address and insert your provided URL – petessupport.noip.com
– for example. Then Click OK.
With a Viewer
profile selected and open, click on the Create Server button (See above for
location)
.
Next you can enhance
security by requiring the user to enter a password. This is optional. But if you select Yes the user will be
required to use the password you entered during the
Viewer profile setup. So be sure to
remember it. Keep in mind for security
purposes it does not show up in the Viewer profile Password box.
Finally, you will see the window below. 123.123.123.123 will be replaced by your
static IP address (or URL) and the passwd will be an encrypted string. This
string is not the same as the Password users must enter if you clicked
Yes on the above screen. This is an
informational screen; no input is necessary.
Just click OK

The
generated self-extracting exe, called "PcHelpWare_server.exe" can be
found in a sub-folder of the myservers folder. The sub-folder will have the
same name as Viewer profile connection that generated it. You can deploy this exe on PCs you want to
remotely assist, but keep in mind all Server exe files will have the same name
(PcHelpWare_server.exe). Since they are
only compatible with the Viewer profile used to create them it might be a good
idea to rename the file to match the appropriate Viewer –
Petessupportserver.exe – for
example. You can create different Viewer/Server combinations for different
locations, PC’s etc.
Using PcHelpWare
Important: Always start the Viewer
before the Server
Open the
PcHelpWare_viewer.exe file. The
application window will look as it did when you first opened the Viewer to
create a viewer profile except any profiles you created will now be listed
in the open area on the right just above the Delete and Save buttons. The top profile may be
highlighted but that does not indicate it is selected. Click on a
profile to load the connection profile into the Alias and Password fields,
as well as the Listen Port field.
The Quality and UpnP settings will also be configured. You can change the settings for this
session, Quality settings for example, if necessary before clicking the
Start button. The Viewer will now be running in Listen mode. Your client’s
computer initiates the connection by running the unique Server executable
file that you provide. The Server
exe file is pre-configured to match the Viewer exe file running on your
machine.
On the Client
Side:
On
the remote machine, have the client run the PcHelpWare_server.exe file (or
the renamed version if applicable).
This can be emailed or downloaded from a website to the clients
machine. Running this file will
open a Server application window on their machine. The client may see one or two Windows Security
screens requesting permission to run the program. They must allow the program to run. The PcHelpware screen shown to the right will display. If you enabled the password requirement when
creating the Server the client must enter it now, if not they can just
click the Connect button. No input
is required in the Login box.

On the clients monitor a
small application window will appear, usually in the upper
left. The green Traffic light in the lower left corner of
the application window indicates the connection is
active.
The client can terminate the session at anytime by left
Clicking on the PcHelpWare icon ![]() in their system tray and selecting
Exit. This will bring up the
PcHelpwareLogon Screen. Click the
Cancel (or Quit) button.
in their system tray and selecting
Exit. This will bring up the
PcHelpwareLogon Screen. Click the
Cancel (or Quit) button.
Router and Port Forwarding.
If
your router supports the MS implementation of UPnP, the Viewer dialog can
attempt to automatically open and forward the router ports. Enable Auto map in the UPnP section (5) to
open the selected Viewer Listen port and forward it to your PC when the Viewer
is started. The result will be
displayed in the Viewer dialog window (6).
If UPnP is not supported you must manually configure port
forwarding.
 By default, the Server exe you generate through PcHelpWare is set to
connect through the Viewer’s Port 5500.
This means the Viewer’s router must have Port 5500 available to the
Internet. The client’s computer will be
using the standard, always open, Internet port and no configuration is required
on their end.
By default, the Server exe you generate through PcHelpWare is set to
connect through the Viewer’s Port 5500.
This means the Viewer’s router must have Port 5500 available to the
Internet. The client’s computer will be
using the standard, always open, Internet port and no configuration is required
on their end.
Firewalls,
stand-alone software, and router configurations, keep most ports closed for
security. To use PcHelpWare you must
open your routers Port 5500 and Forward it to the internal IP address for your
computer.
The two types of IP addresses, Static and Dynamic, have
been explained above in the Before You Start section, but there are actually
two variations of each, Public and Private. A Public IP address is the one used to connect
computers. A commercial domain, Google or Yahoo for example, has a Public
Static address. The network side of a personal router has a Public IP address
assigned by the Internet Service Provider (ISP), Verizon, Earthlink, Comcast,
etc. This is usually Dynamic and that is why you need a service like
No-Ip to simulate a static address to the network. On the internal side of the
router are the Private IP addresses, the ones usually beginning with
192.168.0.0, 10.0.0.0, or 172.16.0.0.
These are blocks of IP numbers reserved for routers to use for internal
network distribution. Your router assigns each computer or device
connected to it a private IP address and that can be dynamic, changing each
time you reboot your router or computer. So even if you set up port
forwarding correctly, your router can assign a different Private IP address to
devices connected to it and input will be forwarded to the wrong internal
port/device.
Copyright 2007 WriteonPoint Communications
You must configure your router/computer
to assign a static Private IP addresses to the computer running the
Viewer. All routers are different
and have different set-up procedures.
You can find details for your router setup at www.portforward.com . Some of the set-up may take place in your
computer’s network configuration as well as your router so read the
instructions carefully.